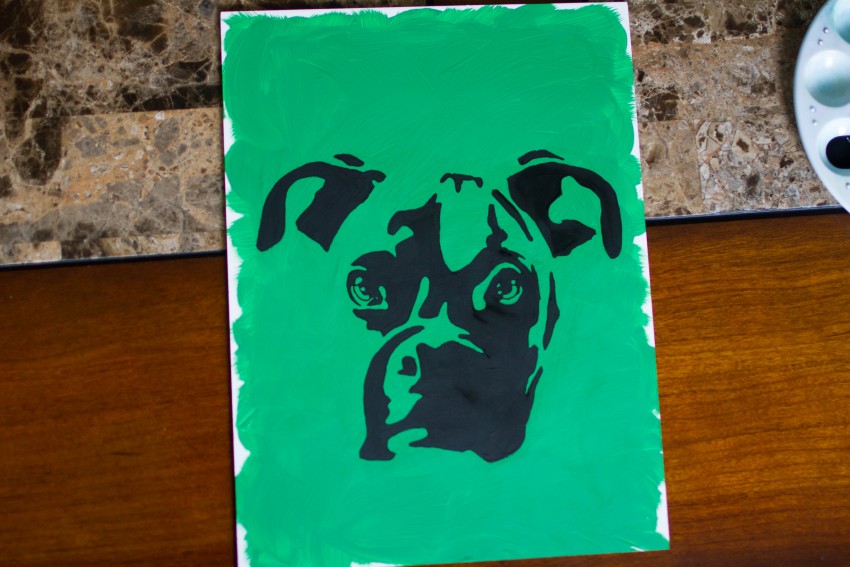
Freehand drawing can be intimidating, and painting can be a frustrating mess. But this 5-step tutorial combines hassle-free painting instructions and simple tricks to avoid any freehand drawing to create a unique and modern portrait of your pet.
Supplies
Many of these supplies are available at arts and crafts stores or other department stores such as Target or Walmart:
- Digital photo of your pet (a clear, well-lit picture)
- Printer
- Art paper or other surface to paint on (I chose a 9″ x 12″ art board but have been known to paint on wooden boards that are nailed together. Be creative!)
- Pen or black marker
- Soft art pencil (Choose 6B or softer, if possible.)
- Paint brushes
- Acrylic craft paint
- Paint palette (You can use a sheet of wax paper as a substitute.)
Step 1: Paint the Background
Choose a paint color for the background. Because the final painting will primarily be one color plus shadows and highlights, choose a color that both contrasts well with black and looks nice hanging on your wall.
After you’ve selected your favorite color, paint the entire background of your art paper.
While that’s drying, move on to the next step.
Step 2: Edit and Print the Photo
Editing your photo might be the trickiest part of this project. Your goal is to have a picture of your pet that has a very high contrast with strong shadows but is also still easily recognizable.
Follow these steps using a photo editing software program (I used Microsoft Office Picture Manager):
- Crop your photo so that your pet takes up the entire picture.
- Convert the picture to black and white.
- Increase the contrast of your picture.
- Adjust the midtones, highlights and brightness as needed to obtain a photo that is primarily black and white (with fewer shades of gray).
- Flip your photo horizontally, creating a mirror image of the original.
- Print the photo. Depending on the size of your painting, you may need to print the picture on multiple sheets of paper.

To avoid losing too many details while editing your pet’s picture, watch the eyes. If you have darkened the photo so much that you can no longer see the iris, then you’ve lost too many details and need to pull back on the shadows. If your pet’s iris is always very dark, watch another part of the fur or nose as a threshold for visibility.
Step 3: Outline and Transfer Your Photo
Using an art pencil, outline the dominant shadows on your pet’s picture. Include the most important aspects of your pet — you’re creating the parameters that will be filled with black paint later. Eyes, ears and wrinkled foreheads especially should be detailed here.
After you’ve created the outline, place the picture face down on your (dry) painted page. You’re now going to transfer the outline onto your art piece. Holding the printed photo firmly, use the blunt end of a paint brush or a similar tool to rub against the back of the page.
This technique will rub the soft graphite from your outline onto the painted surface, leaving a perfect sketch for you to paint over. Because you printed a mirror image of your pet, the picture will appear correctly in your final version.
As you rub along the back of the page, you can peel back corners of the picture to ensure the outline is transferring evenly. (If you didn’t use a soft pencil, this will be difficult because harder graphite mixes don’t transfer easily.)

Step 4: Paint Your Pet
First, use the pen or marker to redraw the pencil lines on your painting, just to emphasize the parameters.
Next, color in the lines. Just use black paint to bring to life a modern, colorful rendition of your fluffy family member!
Step 5: Final Touches
You can add some optional flourishes after completing the painting. In my piece, I colored Charlie’s irises with a slightly darker shade of green. I used white to detail his eyes and added decorative dots around the simple background.
While you’re waiting for your painting to dry, clean off your palette and brushes. Nothing ruins art supplies quite like paint dried on a brush! The very last step is to sign your painting.
Chances are you have plenty of leftover supplies, so consider making one of these for each of your pets and even as gifts for pet-loving friends!


